Earlier this week, I had the unfortunate necessary task of rebuilding an important machine at work due to the limited way I had created an initial testing bench for our single-cell RNA sequencing experiments. As I’m mainly the only person in my research group comfortable of working in a Linux environment, I thought I’d document the steps I took to build a bioinformatics in silco lab. This would not only serve as an instruction manual for the future, but also demonstrate how straightforward it can be to start working with Linux*
* Every Linux user would give you a half-laugh while encouraging you to go forward with this disclaimer: Linux often provides reliability, simplicity, and reproducibility to complex tasks (often for free). It also often makes the simplest of tasks a hair-pulling endeavor. You will develop a love-hate relationship with it (not unlike Windows or MacOS)
Hardware
We’ll be working to setup a next-generation genomics workbench on one of the machines I have available. In no way are these the minimum requirements to run various parts of a single-cell RNA sequencing experiment. It is provided below as a reference. As a general rule of thumb, having more CPU cores, more RAM, and a (NVidia) GPU helps speed up the workflow. If you are starting off the raw FASTQ files and loading them into CellRanger, you will have greater hardware requirements than what is offered on most personal laptops. Downstream analysis can be performed without a GPU, but will take many times longer to complete.
- Operating System: Debian GNU/Linux 12
- KDE Plasma Version: 5.27.5
- KDE Frameworks Version: 5.103.0
- Qt Version: 5.15.8
- Kernel Version: 6.1.0-9-amd64 (64-bit)
- Graphics Platform: X11
- Processors: 32 × Intel® Xeon® CPU E5-2690 0 @ 2.90GHz
- Memory: 125.8 GiB of RAM
- Graphics Processor: NVIDIA GeForce RTX 3060/PCIe/SSE2
- Manufacturer: Hewlett-Packard
- Product Name: HP Z820 Workstation
Debian as your operating system
When you first look into the Linux world, it can be daunting seeing so many different types of distributions (aka “distros” for short). The open source world allows people to collaboratively work on something together. If a group within the larger group wants to take the project in a slightly different direction, they can do so by “forking” the project. Forks can choose to keep most of the functionality of the main project while introducing some unique features or approaches to their project.

Ubuntu is often a recommended starting place for many who are entering into Linux world, as it offers one of the best out-of-the-box experiences. The reason why I am recommending Debian (the distro Ubuntu is based off of) is because it opens up some more possibilities for virtualization with Proxmox down the road (which is out of the scope of this article and will be discussed in the future).
I use Ventoy to create a bootable flash drive with the latest Debian ISO (for reference, I am installing Debian 12.0.0 at the time of writing this post. The “DVD” type images are a larger initial download. But they help speed things along, especially if you are trying to create a mostly offline operating system.
I would recommend creating a separate partition for the datalad RIA file storage, where we will keep a local archive of all of our experiment files.
Initial configuration
Add the primary user to the sudoers group
In order for you to install anything on the computer, you will need to have administrator privileges. This may be confusing, as you would have entered in a password for both the root administrator account and your own personal account (e.g. pranav is my username). Despite doing all of this, in a brand new install of Debian, you do not have permission to “elevate” yourself to an admin from your main account (e.g. pranav).
# Change user to root
su root

# Now as the ROOT user
#-----------------------
# Add your username to the usergroup
sudo usermod -aG sudo pranav

# Restart the computer
sudo shutdown -r now
Setup repository list
In case you made a mistake, as I did, and forgot to configure the list of repositories during the operating system installation, you can add them by editing /etc/apt/sources.list with nano /etc/apt/sources.list
# Repository list for Debian 12 (includes a few additions to the defaults)
deb http://deb.debian.org/debian/ bookworm main contrib non-free non-free-firmware
deb-src http://deb.debian.org/debian/ bookworm main contrib non-free non-free-firmware

deb http://security.debian.org/debian-security bookworm-security main contrib non-free
deb-src http://security.debian.org/debian-security bookworm-security main contrib non-free

deb http://deb.debian.org/debian/ bookworm-updates main contrib non-free
deb-src http://deb.debian.org/debian/ bookworm-updates main contrib non-free
Next, update your installation with sudo apt update && sudo apt upgrade -y.
Install NVidia drivers

If you have connected your monitors to a NVidia GPU over DisplayPort, you could be experiencing a (potentially seizure inducing) flicker on your screen so far. Thankfully, if you’ve made it this far with the flicker, fixing it is our next step, and it’s quite simple. Install the nvidia-detect package from apt with the command sudo apt install nvidia-detect. For my GPU, I received the following output:
Detected NVIDIA GPUs:
05:00.0 VGA compatible controller [0300]: NVIDIA Corporation GA104 [GeForce RTX 3060] [10de:2487] (rev a1)
Checking card: NVIDIA Corporation NVIDIA Corporation GA104 [GeForce RTX 3060] (rev a1)
Your card is supported by all driver versions.
Your card is also supported by the Tesla drivers series.
Your card is also supported by the Tesla 470 drivers series.
It is recommended to install the
nvidia-driver
package.
Assuming you have the apt repositories configured as above, you can then install the driver with apt install nvidia-driver firmware-misc-nonfree. Then, as advised, restart your computer with sudo shutdown -r now.
Install KDE Plasma Desktop

One of the best parts of Linux is the incredible capacity to personalize everything, including the look and feel of your desktop. While I do not have strong feelings for one desktop environment vs another, I feel that KDE Plasma is one of the best “out of the box” experiences for colleagues who may be hesitant to work on a Linux machine due to a lack of familiarity. KDE largely resembles a Windows 10 environment with a task bar across the bottom and something which resembles a “Start” menu.
You can install KDE Plasma Desktop, which is one of the smaller installations, with sudo apt install kde-plasma-desktop
Install Python via Mamba

Without getting too far into the details, it is highly recommended that you use an environment manager for python. conda by Anaconda is probably the most widely adopted package and environment manager, especially in data science. The one drawback of the original conda is that it takes forever for the software to resolve which versions of packages are compatible and what should be downloaded. Mamba is a drop-in replacement for conda which runs significantly faster than conda. You can have a version with conda-forge preconfigured, which is known as “mambaforge”.
Update: mamba is now the default solver inside of conda. You do not need to install mamba-forge separately
# Create a tmp folder inside of your user directory
mkdir -p ~/tmp && cd ~/tmp

# Download mambaforge and run the installer
wget "https://github.com/conda-forge/miniforge/releases/latest/download/Miniforge3-Linux-x86_64.sh"
bash Miniforge3-Linux-x86_64.sh

# Accept the license terms and allow the "init" script to run
Configure SSH for secure, remote access
Again, for the purposes of this article, I will assume that you know the basics about SSH.
# Make a new directory for SSH

mkdir -p ~/.ssh
nano ~/.ssh/authorized_keys

# Download your SSH public keys (which you may have readily available at github.com/<yourusername>.keys
curl -s https://github.com/pranavmishra90.keys >> ~/.ssh/authorized_keys

# Paste in or generate a new private key (whichever you prefer)
# Make sure that the permissions on the private key are set correctly
chmod 400 ~/.ssh/id_ed25519

# Change your SSH configuration
sudo nano /etc/ssh/sshd_config
Setting up your sshd configuration file is a long discussion in itself. Because I am preparing to use Tailscale, which can take over port 22, I will change the default SSH port. After adjusting the file, restart the SSH service with sudo systemctl restart ssh
Personalize your settings with dotfiles / Yadm
yadm is an free, open-source program which stands for Yet another dotfile manager. When you are frequently jumping between different Linux machines, you want to make sure that your command-line personalization is uniform. Command line interface (CLI) personalization is often saved in “dotfiles” which are files that begin with a dot (e.g. ~/.bash_profile) and are often located in your home directory ~/. First, install yadm with sudo apt install yadm. Then download your dotfiles by doing yadm clone <url>
Want to see what some of these configurations look like? Check out my dotfiles on GitHub at pranavmishra90/dotfiles. You can load these in with yadm clone https://github.com/pranavmishra90/dotfiles.git (Note: for my own repository, I use SSH authentication with GitHub. So the corresponding command will be yadm clone [email protected]:pranavmishra90/dotfiles.git)
Install Docker
In the past, I’ve almost exclusively used the standard docker engine, which you can find the installation instructions for here. Today, I wanted to explore Docker Desktop a bit further with its inherent capacity to leverage tailscale on a container level basis. The official documentation on the docker website is usually all that’s needed. It’s important to know that the Desktop version of Docker is not entirely FOSS (free and open source software). You will have to look into seeing if the license terms apply to your use case.

You will need to have a PGP key in place for your user account in Debian. PGP is one of oldest and widely established encryption technologies. Beyond just allowing you to encrypt anything from text, to email, to files, one of the most common uses of PGP is to “sign” files, as a way of proving that the file was created exactly by the person who claims to be the creator (and not a malicious impostor).
Install Zsh
Zsh is a newer alternate shell to the standard bash prompt. While there are many things that look and work much better on zsh over bash, I often find myself switching to bash for compatibility with certain commands. It’s more of a slightly annoyance of having to type in bash while you’re trying to get something done quickly. I would also recommend using the PowerLevel10k theme manager to get zsh working exactly how you’d like it.
# Zsh installation
sudo apt install zsh

# PowerLevel10k installation
git clone --depth=1 https://github.com/romkatv/powerlevel10k.git ~/powerlevel10k
echo 'source ~/powerlevel10k/powerlevel10k.zsh-theme' >>~/.zshrc
Preparing your bioinformatics workbench
Install NVidia CUDA to leverage your GPU for machine learning
Official installation instructions can be found at NVidia’s website for CUDA. Again, the documentation is well-done, and I will follow along their documentation.
(base) pranav: temp : lspci | grep -i nvidia
05:00.0 VGA compatible controller: NVIDIA Corporation GA104 [GeForce RTX 3060] (rev a1)
05:00.1 Audio device: NVIDIA Corporation GA104 High Definition Audio Controller (rev a1)

(base) pranav: temp : uname -m && cat /etc/*release
x86_64
PRETTY_NAME="Debian GNU/Linux 12 (bookworm)"
NAME="Debian GNU/Linux"
VERSION_ID="12"
VERSION="12 (bookworm)"
VERSION_CODENAME=bookworm
ID=debian
HOME_URL="https://www.debian.org/"
SUPPORT_URL="https://www.debian.org/support"
BUG_REPORT_URL="https://bugs.debian.org/"
When checking for the gcc compiler, I received the following error, indicating that I had to install gcc
(base) pranav: temp : gcc –version
-bash: gcc: command not found
gcc can be easily installed with:
sudo apt update && sudo apt install build-essential
sudo apt-get install manpages-dev

# Confirm that gcc is working with
gcc --version
gcc (Debian 12.2.0-14) 12.2.0
Copyright (C) 2022 Free Software Foundation, Inc.
This is free software; see the source for copying conditions. There is NO
warranty; not even for MERCHANTABILITY or FITNESS FOR A PARTICULAR PURPOSE.
At the time of writing, Debian 12 is about 1 month old. We will be using the Debian 11 installer from the NVidia website, since it is the closest one available.
wget https://developer.download.nvidia.com/compute/cuda/repos/debian11/x86_64/cuda-keyring_1.1-1_all.deb
sudo dpkg -i cuda-keyring_1.1-1_all.deb
sudo add-apt-repository contrib
sudo apt-get update
sudo apt-get -y install cuda
Install VSCode
# Download the latest installer
cd ~/tmp
wget https://code.visualstudio.com/sha/download?build=stable&os=linux-deb-x64

sudo dpkg -i code_1.80.0-1688479026_amd64.deb
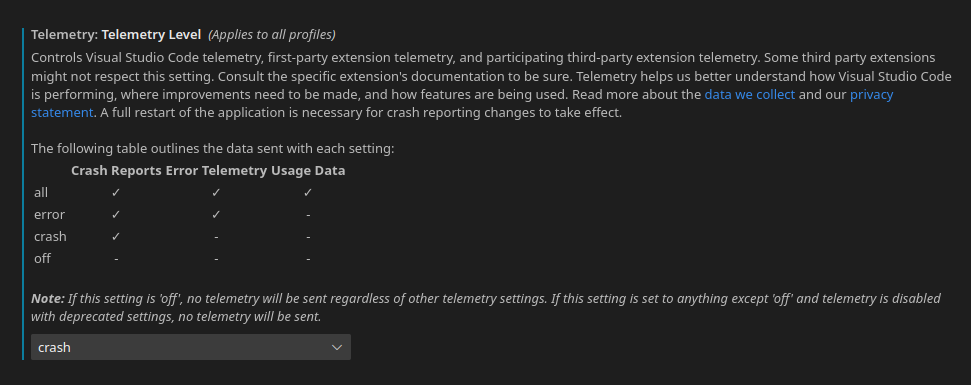
VSCode is one of the most well-regarded open source projects. The official version, maintained by Microsoft, has a number of features which allow for integration with GitHub and the extensions store. Open-source purists may note that some of these features come with a trade-off of telemetry and proprietary code. If this bothers you, there are forks available. For me, the official VSCode or the related coder/coder platforms have a far greater trade-off of using the official version for maximum feature availability. The biggest “quality of life improvement” comes with the GitHub settings sync, repository integration, and the capacity to share, tunnel, etc with other users. I would still recommend limiting telemetry, though.
You can find this in the settings (Control + ,) under “Telemetry: Telemetry level”. To see the telemetry settings of all VSCode, including extensions, search for “telemetry”. I’m usually someone who keeps telemetry settings at the absolute minimum. However, with certain open source projects that I love, I enable minimal settings. It can help provide valuable insight for improving the programs you heavily rely on.

Install Quarto
# Download the latest version of quarto: https://quarto.org/docs/get-started/
cd ~/tmp
wget https://github.com/quarto-dev/quarto-cli/releases/download/v1.3.433/quarto-1.3.433-linux-amd64.deb

# Install quarto
sudo dpkg -i quarto-1.3.433-linux-amd64.deb
Single-Cell RNA Sequencing: the essential packages
With mamba installed, you can get a “turnkey” solution to having most of what you need to get going by creating a new environment with the necessary packages. I have a properly formatted YAML template for conda / mamba, called environment.yml. I’ve including a gist below, which shows the latest version of my python environment for scRNAseq experiments.
With datalad, I can keep the conda / mamba environment file in sync between all of my projects:datalad download-url --nosave --path ./python/environment.yml -o "https://gist.githubusercontent.com/pranavmishra90/40e71f8928695663765ef48d117f4ad8/raw/environment.yml"
Recommended workflow
scRNAseq (or bioinformatics projects, in general) are inherently complex, with a large number of files, where some may be in the hundreds of gigabyte range. Staying organized is critical for experiment reproducibility (and your own sanity!). I can (and hope to) write a series of posts on creating reproducible research environments. For now, I will describe the overall project setup.
Create a “work” directory containing all of your projects
My work directory looks like:
(base) pranav@singulab work : tree -d -L 2
.
├── bfgi
│   ├── animal-studies
│   ├── code
│   ├── deploy
│   ├── documentation
│   ├── human-studies
│   ├── licenses
│   └── templates
├── oa-ptoa
│   ├── cell-culture
│   ├── code
│   ├── deploy
│   ├── explant-PTOA
│   ├── licenses
│   ├── microCT
│   ├── notebook
│   ├── output
│   ├── synovial-fluid
│   ├── templates
│   └── tribology
├── pranavmishra90
│   ├── Curriculum-Vitae_Pranav-Mishra
│   ├── genomics-studio
│   ├── laboratory-labels
│   ├── protocol-timer
│   └── research-reference
└── prrx1
    ├── code
    ├── deploy
    ├── figures
    ├── licenses
    ├── notebook
    └── scRNA-seq
Under the main ~/work directory, I have the three main projects that I am actively working on listed. Nested underneath a directory with my git username at ~/work/pranavmishra90, I’ve quickly pulled down a few important repositories which I use regularly (or should update soon, like my CV!).
I was able to rapidly retrieve all of my projects on a brand new Debian installation with the magic of datalad, which uses git and git-annex in the background. More on datalad in some coming posts!
Use separate environments in Python and R for each of your projects
Mixing and matching environments can lead to hair-pulling headaches after accidentally installing / ‘upgrading’ one of your packages which then downgraded many others automatically, breaking all of your code.
It’s even better to work inside an entire virtual environment, either as a Virtual Machine or a Docker-like container (more on this in the future). If you would like to get started using something like this immediately, I have a few Docker images / GitHub repositories that you might find useful:
pranavmishra90/SinguLab: An ‘all-in-one’ python / Jupyter notebook based containerized lab with many of the components I’ve descrive above pre-installed.
pranavmishra90/genomics-studio: R-studio with seurat, monocle, and more pre-installed
pranavmishra90/quarto-containerized: Create publication quality websites, PDF documents, wiki, and more all from one markdown document which can execute python, R, and LaTex code to render content, using Quarto.
Need more guidance or have any suggestions? Reach out to me
If you have a question or comment on the process I describe above, feel free to reach me by my website, social media, or email!
